Here is the Pattern on Ravelry where you can download the pdf and see other projects.
YaYaLovesToKnit, April 19, 2017
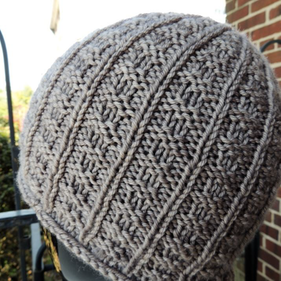
This hat was joyfully knit for the project, using a modified sailor’s rib stitch. Instead of knitting through the back loop, all the knit stitches are through the usual front loop. The look is clean and “straight ahead”, and the fit of the hat is nice and stretchy. The stitch pattern is easy to memorize and the project is a quick knit.
Size: Adult
The sample hat measures 9” from top to bottom, and 16” around the bottom edge, without any stretching. As knit, the hat is soft and stretchy and will accommodate head sizes up to 24” without any problem.
If you wish a larger or slouchier hat, knit additional repeats of the 4-round stitch pattern in the body of the hat. This will allow the hat to stretch further without losing length.
Yarn:
1 skein worsted/aran weight yarn
The sample hat was knit using 67 grams/117.2 yards of Neighborhood Fibers’ Studio Worsted. There is much diversity in worsted weight yarns so if your worsted is on the thin side, consider going down a needle size and increasing the number of cast-on stitches to 90.
Needles: 16” or 20” circular needles in size US 07 to knit the bottom of the hat and US 08 to knit the body of the hat, plus US 08 double pointed needles to knit the decreases in the top of the hat.
Other tools: stitch marker, and a tapestry/darning needle
Gauge: 17 stitches x 24 rounds = 4”
Abbreviations used:
dec = decrease
k= knit
k2tog = knit two stitches together
p = purl
p2tog = purl two stitches together
p3tog = purl three stitches together
rem = remain
rnd(s) = round
st(s) = stitch(es)
Stitch Pattern:
The following 4-round stitch pattern is repeated throughout the hat until the crown.
Rnds 1 and 2: [p1, k2, p1, k1] around.
Rnds 3 and 4: [p4, k1] around.
Begin the hat:
Using the US 07 circular needle, cast on 80 sts. Taking care to not twist the stitches, join to begin knitting in the round. Place marker to indicate the beginning of round.
Knit 3 rnds to create a rolled edge.
Knit 4 repeats of the 4-rnd stitch pattern. At this point the hat measures approximately 2-½” from the bottom edge (not including the rolled edge).
Body of Hat
Change to US 08 to begin the body of the hat. Continue knitting the 4-rnd stitch pattern until the hat measures approximately 6-½ “ from the bottom edge (not including the rolled edge). 10 repeats were knit in the sample hat.
For a slouchier fit, knit additional repeats.
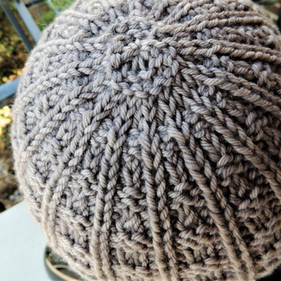
Crown of Hat (decreases)
When the number of stitches become too few to work comfortably on the circular needle, change to double pointed needles.
Rnd 1: [p1, k2, p1, k1] around.
Rnd 2: [p1, k2tog, p1, k1] around – 16 sts dec – 64 sts rem
Rnds 3 and 4: [p3, k1] around.
Rnds 5 and 6: [p1, k1] around.
Rnd 7: [p3, k1]
Rnd 8: [p3tog, k1] – 32 sts dec – 32 sts rem
Rnds 9 and 10: Knit around.
Rnd 11: [p2tog] – 16 sts dec – 16 sts rem
Rnd 12: [p2tog] – 8 sts dec – 8 sts rem
Finishing: Cut the yarn leaving at least a 12” yarn end. Using the darning needle, thread the yarn through the remaining 8 stitches at least twice; cinch snugly and anchor the yarn.
Weave in the yarn ends. Steam or block the hat if desired.
Pattern is for personal use not for publication or profit.
©️yayalovestoknit
